Let's say you have a young, otherwise healthy patient who took a little spill after having a few cold ones, and now he/she has a significant painful deformity in their right shoulder. They cannot touch their contralateral shoulder, not even close. You check a Y-View and you see a classic anterior dislocation. Unless you want to do Civil War medicine, you need to get them relaxed for the reduction. Again, procedural sedation is fun, but it is time and resource consuming, and not without risk. Intraarticular injections can be helpful (and kind of fun!), but they don't result in success 100% of the time. THERE HAS TO BE A BETTER WAY!
Sorry, I figured that probably wasn't funny the first time. But again, our friends in the world of anesthesia have had a better weapon in their armamentarium for some time now. And that weapon is the interscalene block. If it works in the OR, why can't it work for us?
When you do one of these, you will preferentially knock out the trunks of C5 through C7. This will cover the shoulder and proximal upper extremity while leaving the medial arm and hand intact. Get set up essentially as if you are about to place a central line in the internal jugular (if you want to see our posts on doing IJ's blind, click here). Visualize the IJ and the carotid as you usually do, and then keep moving laterally until you see the muscle bellies of the anterior and middle scalenes. The trunks should be seen between these bellies. They do look a lot like vessels, so it's always safe to use your doppler to differentiate them.
Advance your 20 G spinal needle away from your probe, injecting anywhere from 10-20 cc of bupivicaine (or lidocaine) into the potential space. Don’t overshoot on your anesthetic volume – too much can overflow into the potential space anterior to the anterior scalene muscle, where the phrenic nerve lies. The easiest way to accomplish this is to cover your targeted nerve trunks in a pattern, in small aliquots so that you surround the nerves concentrically. You should start seeing effects after about 15-20 minutes.
Here's yet again another great demonstration from the people at SonoSite:
Per the usz, these writings are for EDUCATIONAL PURPOSES ONLY. If you recklessly try one of these and drop a lung, it's on you, mon frere, not us. Keep safe, we'll talk more about blocks soon!
jps
References
Roberts and Hedges Clinical Procedures in Emergency Medicine. Saunders 2014, Chapter 31
Blaivas, M., & Lyon, M. (2006). Ultrasound-guided interscalene block for shoulder dislocation reduction in the ED. The American Journal of Emergency Medicine, 24(3), 293–296. doi:10.1016/j.ajem.2005.10.004
Hey Clubhouse! Sorry we've been out of the loop lately. We all just flew back in from San Diego, and boy are our arms tired.
One of our beloved colleagues from the community has recently declared to us his love of ultrasound guided nerve blocks--a skill that is established in the anesthesia world but is quickly gaining traction in our realm. Some programs are training their residents in this skill, and some aren't. But we've been inspired to talk about it! That said we will now be featuring a series of posts on this very subject. Our inaugural post today: femoralnerveblocks.
Let's say we do a little time warp, and we are unfortunately six months into the past, stuck in the dredges of frigid winter. EMS appears with a patient who just wiped out big time on the ice. He's gripping his thigh with his hands, and he is screaming. Maybe he's broken his hip? Maybe it's dislocated? Maybe he cracked the shaft of his femur? For this exercise, let's say that it doesn't matter.
What does matter is that it looks like this might need a little pushing and pulling, either to get it reduced or maybe just for re-positioning for imaging. Procedural sedation? I mean, we're always down for that, but is there a better way?
Turns out there is! Specifically we will discuss the femoral 3-in-1 block--so titled as it knocks out the lateral cutaneous, obturator, and femoral nerves. This will completely anesthetize the femoral shaft, with some coverage of the proximal end of the femur. This can be done blind, but adding U/S greatly increases the chance of success--the evidence that's out there has shown that using a probe gets you blockade faster and has a higher rate of complete blockade.
You'll need the following for your setup: an U/S machine with a linear probe, a 21 G spinal needle, a vial of 0.5% bupivacaine, sterile gloves, a sterile probe cover, and sterile gel.
Essentially your goal is to infiltrate the fascial sheath, allowing for the rapid distribution of anesthetic to the above mentioned nerves. And to properly do this procedure, you'll need a LOT of local anesthetic--our sources recommend up to 30 mL of bupivacaine.
When done blind, to confirm you'll either feel a gratifying "pop", your patient will get a paresthesia, or you will feel the pulsations of the femoral artery pushing your needle laterally. But we can do it better! For this jobby, prep and drape the area. Place your probe per convention in the transverse plane, starting at the inguinal ligament. Slide down until you can see the femoral vein and artery (about 2 cm caudad). You shouldn't miss these guys. Just lateral to them is the femoral nerve, which appears as a hyperechoic triangular structure.
Make a wheal for entry just lateral to the probe. Then go in with your spinal needle directed medially at a 30 degree angle. Get your tip as close as possible to the nerve, and then inject (well, after aspirating first, of course). You should see the local anesthetic spread the tissues in a cephalad direction. You'll want to hold pressure distally during all of this, and then 5 minutes after injection.
Here's a demonstration from the fine people at SonoSite:
Here's the usual video (with the usual hilarity) from Whit Fisher:
As always, these posts are for EDUCATIONAL PURPOSES ONLY. These nerve blocks have the potential to be huge for us as emergentologists, but don't take our word for it. Do your research, and always be safe.
jps/bmc
Sources:
Roberts and Hedges Clinical Procedures in Emergency Medicine. Saunders 2014, Chapter 31
Beaudoin, F. L., Haran, J. P., & Liebmann, O. (2013). A Comparison of Ultrasound-guided Three-in-one Femoral Nerve Block Versus Parenteral Opioids Alone for Analgesia in Emergency Department Patients With Hip Fractures: A Randomized Controlled Trial. Academic Emergency Medicine, 20(6), 584–591. doi:10.1111/acem.12154
Cristos, S., Chiampas, G, Offman, R, & Rifenburg, R. (2010). Ultrasound-Guided Three-In-One Nerve Block for Femur Fractures. Western Journal of Emergency Medicine. 11(4), 310-313
Turner, A. L., Stevenson, M. D., & Cross, K. P. (2014). Impact of ultrasound-guided femoral nerve blocks in the pediatric emergency department. Pediatric Emergency Care, 30(4), 227–229.
Reid, N., Stella, J., Ryan, M., & Ragg, M. (2009). Use of ultrasound to facilitate accurate femoral nerve block in the emergency department. Emergency Medicine Australasia, 21(2), 124–130. doi:10.1111/j.1742-6723.2009.01163.xdoi:10.1097/PEC.0000000000000101
Fletcher, A. K., Rigby, A. S., & Heyes, F. L. P. (2003). Three-in-one femoral nerve block as analgesia for fractured neck of femur in the emergency department: A randomized, controlled trial. Annals of Emergency Medicine, 41(2), 227–233. doi:10.1067/mem.2003.51
After a long, long wait, Procedures Club Videos are finally here! This month, we present the perpetual challenge of Small Joint Arthrocentesis (specifically the wrist, the elbow, and the ankle). This has been in the making for some time now, and we're very proud to finally present it. It's been a pilot production for us--we learned a lot about making these on the fly. The whole dealie-o has been an inspiration for bigger and better content in the future. So enjoy, but as always remember that these are for EDUCATIONAL PURPOSES ONLY. Don't go tapping like a madman because some guy on the internet told you so.
And yes, we know, John's head is really freaking huge.
Let's say you're sitting in your shop when a sharply dressed fifty-somethingish gentleman shuffles in looking very uncomfortable, but also a bit embarrassed. You take your high quality history, and you reveal that he's been using a product known as "Triple Mix", which is a combination of paparavine, phentolamine, and prostaglandin--formulated for the treatment of erectile dysfunction. And specifically, it's meant to be injected into the penis (and amazingly it's FDA approved!).
You discover that he last used said product eight hours ago, and while the treatment was very effective, his erection hasn't gone away, he's now experiencing some pretty significant pain. You examine him and discover a gloriously tumescent penis. Diagnosis? Priapism! Better get yer gloves on.
Before we do anything, let's start with some basic science review. The erectile tissue of the penis is composed of the cavernosal arteries (the "eyes" of the diagram above), which sit inside the corpora (plural!) cavernosa. An erection occurs when the cavernosal arteries engorge the cavernosa. In normal physiology, this tapers off as cavernosal pressure approaches arterial pressure, until the neuroendocrine system ultimately switches it all off. The blood then drains back out via the emissary veins.
In low-flow priapism (the most common variety), the drainage mechanism gets stuck. this can be caused by compression of the emissary veins (as in iatrogenic cases), venous blockage (seen in sickle cell anemia, leukemia, coagulopathies), or neurohormonal dysregulation (also usually iatrogenic). The far rarer high-flow priapism is caused by uninhibited arterial inflow, and occurs almost exclusively in trauma. Clinically, the hallmark of priapism is a painful erection lasting for several hours in which the glans remains soft and spongy whilst the corpora remains tumescent.
This can make your patients pretty uncomfortable! What's more concerning is that the priapism can potentially result in ischemia from sludging and clotting in the cavernosa. Irreversible impotence is another possibility. So yeah, it's an emergency, and uh, yeah, you've gotta drain it now.
As it turns out, the procedure is not terribly difficult. You can break it down into a few steps:
Before you poke-
Start with a warm sitz bath to help dilate the emissary veins and facilitate drainage. At least, this is what Rosen's recommends we start with. Usually pretty futile but it doesn't hurt to try.
Try peripherally dosing a peripheral vasodilator like terbutaline or hydralazine. These have been quoted as having "variable success."
Once you're ready-
Anesthetize the area with 1 cc or so of lidocaine (WITHOUT EPI!) at approximately 8 o'clock and 4 o' clocl on the sides of the proximal shaft. This avoids hitting the dorsal neurovascular bundle and the urethra. You also shouldn't have to go very deep. Note that the image above uses 10 o' clock and 2 o' clock, which is also acceptable. Be generous with this stuff!
Using sterile technique, stick butterfly needles into the numbed sites, and attach 10 cc syringes to them--smaller syringes will generate better negative pressure. You should be able to evacuate blood immediately. Even if only one side works, there is communication between the corpora, so just keep aspirating.
You can also simutaneously irrigate through a second butterfly with a prepared solution of 10 mg of phenylephrine diluted in 500 cc of normal saline. This will assist with constriction of cavernosal arteries. If the flow stops or slows, give a flush.
Drain until detumescence. It will be a bloody mess.
If you get the desired result of detumescence, you should watch your patient for an hour or so to ensure that cavernosal blood doesn't reaccumulate. If they look good after this, the patient can be discharged home with urology follow-up ASAP. If the techniques fail, the patient needs to go to the OR with a urologist--they will need to consider putting in a shunt or excise some clots under anesthesia.
Dr. Larry Mellick has a great demonstration on his YouTube site here:
Some parting pearls of wisdom:
Ancillary techniques have limited success in improving priapism--you probably just need to drain the thing.
Drainage is not rocket science, you just need to be sure to avoid poking the dorsal neurovascular bundle as well as the urethra.
Always be aware of the potential for symptomatic effects of the aforementioned vasoactive substances, especially if the penis is only semi-erect (hint hint -- the emissary veins will carry your phenylephrine downstream).
And always as always, these writings and musings are for EDUCATIONAL PURPOSES ONLY. Do we really have to remind you to be careful about going at a penis with a needle? Be safe!
ak/jps
Sources:
Roberts and Hedges Clinical Procedures in Emergency Medicine. Saunders 2014, Chapter 55.
Rosen's Emergency Medicine, Chapter 174.
The Northwestern Lake Forest Hospital Department of Urologic Surgery
Good afternoon, doctor. Are you enjoying your quiet Sunday afternoon shift with this snowstorm outside (just playing odds this year)? That's great. Well, I hate to break up the calm, but I have this patient out here in the waiting room? She says she's like a G8P5 or something, and she's 38 weeks, and she thinks she's in labor? She's in a lot of pain and it appears that her contractions are occurring every minute or so.
Maybe you have obstetrical capabilities at your hospital or maybe you don't. In this case it doesn't matter as there is no time. You get the patient into the stirrups and have her push. The head starts coming nicely and quickly, but then everything....stops...all...of...a...sudden. It would appear that this large child has become stuck on the pelvic brim, and is "turtling" back into the womb!
Deliveries in the ED are obviously a rare event, and dystocias are a rarity inside of this rarity (representing about 0.6% to 1.4% of deliveries), but they still happen, and you need to know what to do if you end up with the catcher's mitt.
First of all, you'll need help. A HELPERR to be exact!
This is a great mnemonic to run through the initial algorithm. (ALARMER is another good one). But seriously, first step--call for some help. You will need at least two additional pair of hands regardless of how
Han Solo you like to be in your shop. On top of that, get someone else on the phone. If there's an obstetrician in house, call them. If there's a neonatologist in house, call them. If there's an anesthesiologist in house....you get the idea.
Tell your patient to stop pushing--her Valsalva'ing may potentially worsen the situation so you'll need to take over. Have a look at the perineum--will a quick episiotomy let the baby fall out? The answer is probably not, and it's controversial (some studies have shown that it increases risk for severe perineal trauma), but it's always good to have a look.
The money will likely be in the McRoberts maneuver. Studies have shown that this alone will solve the problem in almost half of cases, so do it right! You'll need an assistant on either side to get the patient's legs back in extreme, extreme super lithotomy to rotate the pubic symphysis superiorally. Have them hyperflex the hips with the knees pushed to the chest.
Supplement this with suprapubic (not fundal!) pressure directed inferiorally to hopefully push the anterior shoulder out. This is also known as the Mazzanti maneuver--dystocia is just crawling with eponyms.
If unsuccessful, try rotational maneuvers like the famous Woods' Screw, aka the Rubin Technique. Essentially you'll want to place a finger into the vagina, anterior to the infant's posterior shoulder. Then rotate 180 degrees, like a big old screw in the wall. The reverse Woods' is as expected, and involves the posterior aspect of the shoulder (and theoretically should be more effective).
Continuing on, you can try to deliver the posterior shoulder by flexing the arm, gripping the humerus (gently and evenly of course) and then sweeping it across the chest and then out the vagina. No luck? We move on to the last "R" of HELPERR, which stands for"roll onto all fours." This refers to the Gaskin maneuver, which utilizes downward traction on the head to allow the posterior shoulder to descend and be delivered. You can also deliver the posterior arm in this position.
There are a number of remaining last resorts, like fracturing the fetal clavicle, or the ultimate Zavanelli, but they are so incredibly risky and controversial we won't even begin to describe them.
Here's a very calm (unlike the real thing) demonstration on a model:
As always, these posts are for EDUCATIONAL PURPOSES ONLY. If you have to catch a baby and you're in trouble, call for help if it's available. Don't try to be a hero. Seriously.
Sources:
del Portal MD, D. A., MD, A. E. H., MD, G. M. V., MD, T. C. C., & MD, J. W. U. (2014). Technical Tips. Journal of Emergency Medicine, 46(3), 378–382. doi:10.1016/j.jemermed.2013.08.110
Gherman, R. B., Goodwin, T. M., Souter, I., Neumann, K., Ouzounian, J. G., & Paul, R. H. (1997). The McRoberts' maneuver for the alleviation of shoulder dystocia: how successful is it? American Journal of Obstetrics and Gynecology, 176(3), 656–661.
Roberts and Hedges Clinical Procedures in Emergency Medicine, Sixth Edition. Chapter 56.
Let's say you're in a small shop at about 2 AM. You've got your feet up and you're reading the Sunday Funnies. Suddenly, EMS comes rolling in with a patient with crushing chest pain. Your EKG is done immediately, and while it does not show a STEMI, let's say it shows complete heart block with the rate somewhere in the upper 30's.
Your local interventionalist/EP is aware and is en route in his Maserati but it's going to be a good 20-30 minutes before he'll arrive. You briefly consider transcutaneous pacing, but when you look back at your nice, cooperative, conscious patient and realize that deep down in your soul you're just not that cruel. Dust off that kit, because it's time to float a pacer, people!
You might be thinking, "Transvenous pacing? Really? That made the cut?" We've chosen to highlight this procedure as it is, on paper, very straightforward, but IRL (as noted by several practitioners we've talked with) it can be filled with tons of confusing variables and details. True, one could always hit the "EMERGENCY" button when in doubt but we're smart enough to understand this on a more sophisticated level. Despite the haters out there, the evidence is clear that we can insert these just as efficiently and successfully as our colleagues up in the cath lab.
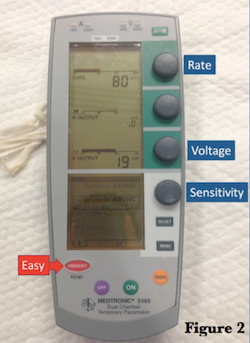
Before we put anything in your patient, let's do a FREEZE FRAME and look at your generator. There's obviously a few commercially available products out there, but they all essentially have the same settings:
1.) Rate - How fast do you want them to go? It depends, but generally you want them above their intrinsic rate, or if they're also getting paced transcutaneously, above that. I've heard experts recommend going about 20 beats higher. 80 bpm is usually a safe place to start.
2.) Output - How much current do you want them to get? These usually run from 0.2 to 20 mA, and you'll want to start with it cranked all the way to 20 to ensure capture. You can adjust this later (and we'll address this again). The Medtronic generator depicted has two settings for output, labelled "A" for atrial and "V" for ventricular. Since we're only going to be tickling the right ventricle in this situation, leave the "A" output at 0 at all times.
3.) Sensitivity - How well do you want your generator to detect voltage? It's a bit nonintuitive: the lower you set it, the more sensitive it gets. These go from 0.5 mV to 20 mV, so if you set it at 0.5 it will detect voltages down to that level. If it detects a native depolarization at that voltage and it's equal or faster than the rate you program, your pacer will not fire. Usually there's an asyncronous mode that just paces like a honey badger regardless of the intrinsic rhythm--and that's generally the setting you want to start on.
These things run on batteries, so also make sure they've been replaced recently.
Now hit the play button so we can insert this guy. We won't go into detail about placing the initial line as this should be obvious, but just remember that you'll need a Cordis in either the right internal jugular or the left subclavian (it's a board question, people!). Get sterile, but you will need a non-sterile colleague to help you when it's time to attach the generator to the cable--unlike most emergency medicine procedures, this will become a two man (or woman) job at this point).
There are a number of different kinds of catheters you can use here but for the sake of time let's assume you have a flotation catheter. They are placed under ECG guidance and generally are the most appropriate for our realm of practice (I mean do you really want to learn about Swan Ganz catheters???)
Thread in your catheter with the balloon down to about 10-12 cm. DON'T FORGET THE SLEEVE! It's very easy to proceed and realize you've forgotten this step once it's too late. Once it's on there it gives you a sterile mechanism to reposition the wire if need be.
Now, hook this guy up! You will need to have your trusty non-sterile assistant attach your line with adaptors to the connecting cable to the box (which, needless to say, goes in the VENTRICLE port). The line marked "proximal" gets attached to the positive lead. If you have an alligator clamp, the distal lead should be hooked up to lead V1 of your EKG machine. This will put you into exploration mode.
Now tell your assistant, "BALLOON UP!" and float that sucker! You'll need about 1.5 cc of air into the balloon, and move it downstream quickly. You're looking for a STEMI pattern as the catheter tickles the very arrhythmogenic endocardium of the right ventricle. Ultrasonography will also enhance your experience as you can directly visualize your wire abutting the apex. Once you're there, deflate your balloon, close it off with the stopcock, and then lock your line with your sheath.
Plug the distal lead back into your box, because it's time to rock and roll. Just like we stated earlier, get your rate at about 80, and then start with your output high. Sensitivity can be asynchronous here. You will need to assess for capture both electrically (QRS complexes that follow the pacer spikes) and mechanically (palpable pulses that correspond to your pacing rhythm). Slowly titrate down your output until you lose capture. It's generally accepted that your output should be about twice the threshold so you consistently get good capture.
Always get a portable chest x-ray once your done to confirm placement, and to make sure you haven't caused any iatrogenic injury.
Here's the legendary Dr. Al Sacchetti demonstrating how he sets up his transvenous pacers (I think this is tailored to nurses but it's still great):
Here's another video of him placing one in an actual patient:
Just as always, these writings and musings are for EDUCATIONAL PURPOSES ONLY. Listening to me babble on in no way shape or form makes you the expert at floating these things. Be smart.
Sources:
Roberts and Hedges' Clinical Procedures in Emergency Medicine, 6th Edition. Chapter 15.
Aguilera, P. A., Durham, B. A., & Riley, D. A. (2000). Emergency Transvenous Cardiac Pacing Placement Using Ultrasound Guidance. Annals of Emergency Medicine, 36(3), 224–227. doi:10.1067/mem.2000.108654
Birkhahn, R. H., Gaeta, T. J., Tloczkowski, J., Mundy, T., Sharma, M., Bove, J., & Briggs, W. M. (2004). Emergency medicine-trained physicians are proficient in the insertion of transvenous pacemakers. Annals of Emergency Medicine, 43(4), 469–474. doi:10.1016/S0196064403010540
Harrigan, R. A., Chan, T. C., Moonblatt, S., Vilke, G. M., & Ufberg, J. W. (2007). Temporary transvenous pacemaker placement in the Emergency Department. The Journal of Emergency Medicine, 32(1), 105–111. doi:10.1016/j.jemermed.2006.05.037
To today's young burgeoning emergency physicians, ultrasound guided internal jugular central catheters have more or less become standard of care. And for good reason! They are safe, and after a good amount of experience, quite easy to perform.
But what if you're practicing in those shops that don't have ultrasound? It's hard to imagine in this day and age but it's the truth in some places. Let's say you're in said department, and a floridly septic patient rolls in. You fluid resuscitate, but after several liters of fluid their blood pressure remains crappier than crappy.
What's your plan, doctor? You can start that norepinephrine peripherally to buy you some time (bollocks to dopamine of course), but you're going to need central access. Femoral lines are easily done blind, but you'll be unable to get CVP's, and the infection risk limits their lifespan.
Some of our colleagues who have been in the game more than a few years often quip, "In my day, we did all these blind, you know...." Maybe we should take some advice from our wise forbearers and learn a thing or two.....
Clearly, your setup will be the same as it always is, with your kit that includes your local anesthetic, finder needle, wire, dilator, scalpel, suture, and catheter. And it's still sterile as humanly possible, of course. To make everyone's life easy, we'll just assume there is no reason you can't use the right IJ and describe the procedure as such.
Your best friend will be your sternocleidomastoid. Know it like the back of your own sternocleidomastoid! You can access the IJ either anteriorally, centrally, or posteriorally to this landmark. To come at it anterior, find where the medial edge of the SCM meets the clavicle, and measure up 2-3 fingerbreaths. Come in from 30-45 degrees and aim at the nipple. Generally speaking, this approach carries the highest risk of arterial injury.
To come centrally, identify the triangle formed by the clavicle and the two heads of the SCM. Your needle will enter at the apex of said triangle at an angle of 30 degrees, also aiming at the ipsilateral nipple.
Finally, the posterior approach brings you higher up in the neck, decreasing the risk of carotid puncture of pneumothorax. You'll need to come about halfway up the lateral edge of the SCM, and come in pretty steep at 45 degrees. Instead of aiming at the nipple, you'll want to come in at the suprasternal notch. Look out for the EJ on your way in!
The official New England Journal of Medicine video on IJ placement is largely ultrasound driven, but they do have some pretty impressive graphics regarding positioning in an ultrasonagraphically poor world.
Scott Weingart has a demonstration on the EMCrit blog:
This is just part of a fantastic piece on central lines that can be found here. I highly suggest you check it out.
Just as always, these posts are meant for EDUCATIONAL PURPOSES ONLY. Are you still only comfortable with doing these with a probe? Maybe you should go practice on a model first.
Stay tuned--Procedures Club Videos are coming to a website near you!
jps
Sources:
Roberts and Hedges' Clinical Procedures in Emergency Medicine. Chapter 22.
New England Journal of Medicine Videos in Clinical Medicine.
EMCrit.org
Life in the Fast Lane Website, Central Venous Catheters